Showing posts with label Tools. Show all posts

How to draw a 3D gear object using CorelDraw?

No, No, as title says, You can not make a real 3D objects in Corel Draw, but you can create an illusion of it. And after that you can use it to make a logo of some organization. It’s depends on your imagination that how you look your object in your subconscious mind. In this tutorial you will learn  how to draw a 3D gear.
First of all close your eyes and imagine that how gear is look like. If you cant imagine you can search on Google’s image section (or Click here). This is just for our reference and give you an idea to draw our object. So let's start…….

Final Image:

Draw a 3D gear object

Step 1: Draw a Polygon

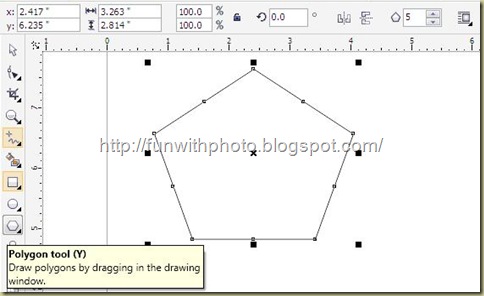
First of all we need to draw a polygon drawing, so select a polygon tool from the left tool bar and draw a polygon by dragging. When you select a polygon tool, a separate polygon tool bar will be enable automatically at top.
Draw a 3D gear object
Well there are 5 sides polygon as default, but we need 16 points or sides, so look at the top. and increase points or sides option to 16 from 5. Your polygon is look like almost a circle as shown in below screenshot but it is not circle.
Draw a 3D gear object

Step 2: Using Shape Tool

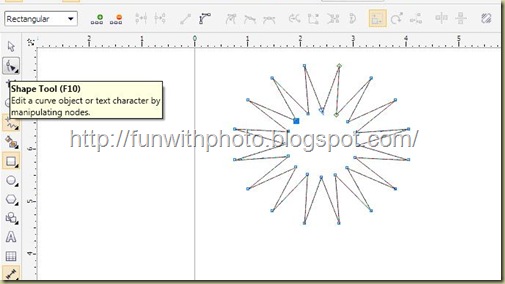
Now select a shape tool from left side tool bar. Click on any node and drag it to the center point of polygon till the shape is look like 16 threads star as shown in below image.

Draw a 3D gear object

Step 3: Adding and Subtract Nodes

Make sure you selected shape tool, by double clicking you can add two nodes (see below image). These nodes will be automatically added on every teeth.
Draw 3D Gear Object
Now to make a perfect shape of teeth we need to subtract a node point which is located at the corner point of every teeth,
Draw 3D Gear Object

Double click on any one node and your object will be like shown as in below image.

Draw a 3D gear object

Step 4: Fill Color like metallic surface.

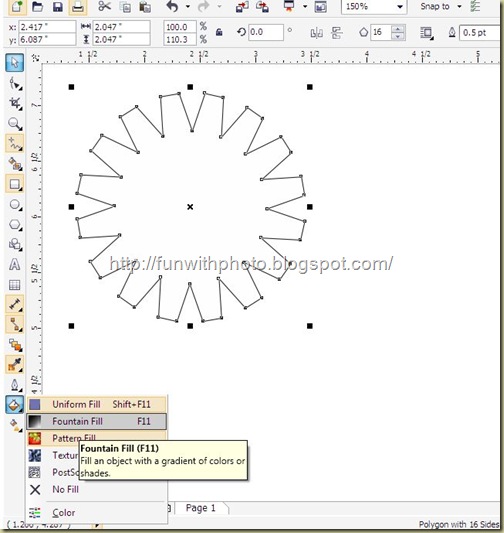
To fill colors select an object. Remember we are going to make a 3D object, so uniform color is look so good. To create a metallic surface illusion, chose a FOUNTAIN FILL TOOL from the left side tool bar.
 Draw 3D Gear Object
In the coming up next little window, chose any two colors light/dark combination whatever you like, set an angle, and click OK.
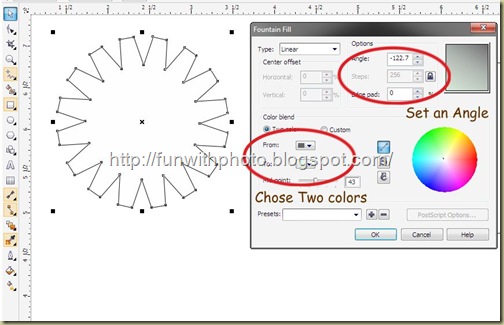
Draw 3D Gear Object
See your object is now look like metallic shiny surface.

Draw 3D Gear Object

Step 5: Draw a circle

Now draw a circle  using Ellipse tool. Make sure that ratio of height and width are same for a perfect circle.
 Draw 3D Gear Object

Now put the circle on our polygon star as like in below picture. when you drag circle on polygon star, it will be automatically displayed CENTER point, so you can easily put it at on center.
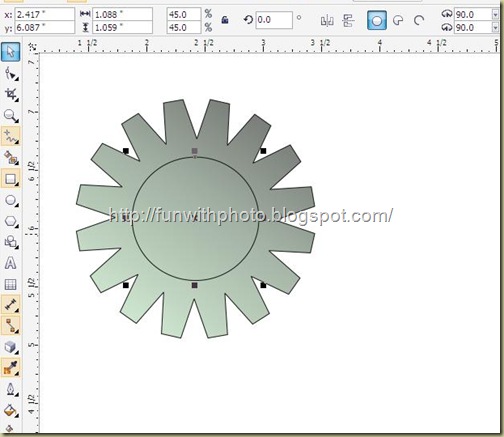
 Draw a 3D gear object
We have to remove outline of circle. Click and hold on an OUTLINE PEN TOOL and select NO OUTLINE.
Draw a 3D gear object

Your circle is still there but without outline.

Draw a 3D gear object


Step 6: Trim two objects.

Now click your mouse left button somewhere else and drag it to select both of objects. See at the top some tools enabled like WELD, TRIM etc….
Draw a 3D gear object

Click on TRIM BUTTON and see your 2D gear is ready.
Draw a 3D gear object

Step 7: Create a 3D illusion look

For create an illusion if 3D object select an EXTRUDE TOOL.

Draw a 3D gear object

Select presets and chose any 3D example whatever you like.
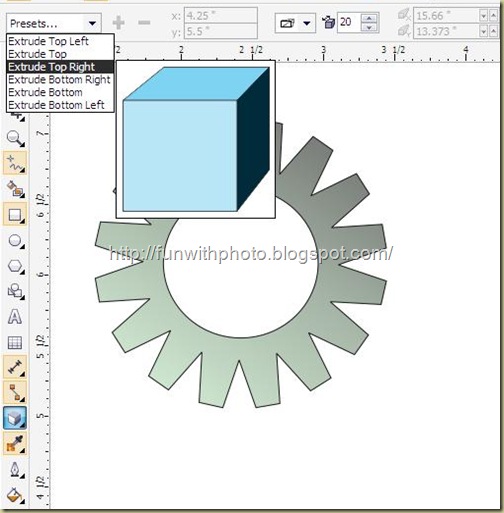
Draw a 3D gear object

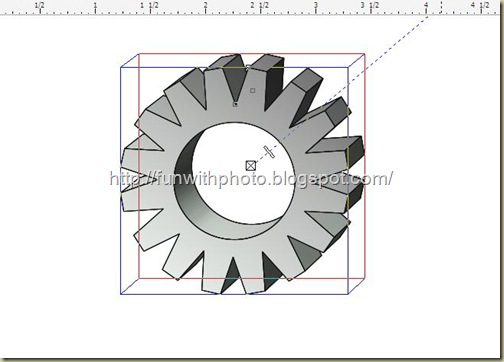
See your 2D gear converted in to 3D illusion. Set the depth of your gear object.
Draw 3D Gear Object
And your 3D gear is ready.
Draw a 3D gear object
You can use it to create a logo, or whatever you need. Remember tutorial gives you an idea only. Practice will makes man perfect. Please post comments if you like this tutorial.

How to convert image into vector?

We know that we can convert our vector creation into bitmap image (See my previous tutorial Create a smoke effect in Corel Draw step 6), infect we can save it in many vector and image formats, but what you do if you have an image but you want to convert it into vector format? yes, Corel’s amazing power trace feature can easily covert your JPG or BITMAP Image into scalable vector. Before I start please keep this in your mind that, it will convert image into vector, so there are also some drawbacks of it. Like if your image is multi colored, result will get not so good. But still you can get better than the best result with some adjustments. So let’s start to learn about this amazing feature step by step.

Final work done.

How to convert image into vector?

Step 1 : Importing Image.

First of all open a new blank document in CorelDraw. Now import your image go to FILE in TOP MENUBAR and click on IMPORT. Find out an image which you want to covert it into vector. Please do not select very highly colored image to get a best result.
How to convert image into vector?

Step 2: Enable power tracing manubar

Select your image. See when you select it, power tracing menu bar options enable. You can also edit the image by clicking on EDIT IMAGE. It will be open directly in Corel Photopaint. 
How to convert image into vector?

Step 3: Power tracing bitmap

For power tracing, click on TRACE BITMAP, Now you have many option to trace your image.
How to convert image into vector?
For example move your mouse on TRACE OUTLINE and click on DETAILED LOGO. In coming up next window you have trace control like DETAIL, SMOOTHING and corner smoothness. You have also options to remove background and keep original bitmap. Power tracing feature will automatically trace curves, nodes colors. You can see them at bottom. 
How to convert image into vector?
You can adjust your power tracing performance also. To do this click on OPTION button which is located on bottom left corner. In next window adjust it.
How to convert image into vector?
When you satisfied with your vector image click OK and you done!!! Your image is converted in to vector now but all nodes and curves are grouped, so follow this steps TOP MENUBAR > ARRANGE > click on UNGROUP or press CTRL + U.
How to convert image into vector?
Finally you vector image is ready… You can change any single color or shape now (want to know about shape tool? Click Here ) ….. Enjoy!!!
How to convert image into vector?
Please do comments if you like this Tutorial.

Create a smoke effect in CorelDraw

Many times I used smoke effect to create an attractive designs, I searched on net about smoke effect for corel, just because I want to find more easy way to create this effect,  but can’t satisfied with other tutorials. So I am inspired to write this tutorial. In this tutorial you will learn how to create a smoky effect in Corel Draw X5.

Final Image :

Smoky Effect 14

STEP 1 : Background

Open a new blank document in CorelDraw. Draw a rectangle with RECTANGLE TOOL. Select it and applied black (or any dark color). This is our background.
Smoky Effect 1

STEP 2 : Draw lines

Now chose a FREEHAND TOOL and draw a line anywhere like shown in below screenshot. Draw two three more lines.
Smoky Effect 2
 Smoky Effect 3


STEP 3 : ARTISTIC MEDIA TOOL

Select all lines that you draw in step 2. Chose an ARTISTIC MEDIA TOOL, select category calligraphy and  Chose BRUSHSTROKS both are marked as an arrow in below screenshot.
Smoky Effect 4

Your lines are converting into your selected Brushstrokes.

Smoky Effect 5

STEP 4 : Applying Color

Now apply any light color on your lines.
Smoky Effect 6

STEP 5 : OUTLINE PEN TOOL

Make sure that all lines were selected. Chose OUTLINE PEN TOOL remove outline by clicking on NO OUTLINE.
Smoky Effect 7

STEP 6 : Converting Vector in bitmap

Put your lines on our dark background which we made on 1st STEP. In the next step you have to apply blur your lines, but you cant blur vector lines. So we have to convert all lines group object into bitmap. Follow these steps to convert it into bitmap. (Make sure all lines were selected).
TOP MENUBAR > BITMAPS > CONVERT TO BITMAP
You can chose DPI also in coming up next little window. Your Brushed lines are converted into bitmap now.
 Smoky Effect 9

STEP 7 : Blur bitmap image

To create a smoky effect, you have to blur your lines bitmap image. Follow these steps.
TOP MENUBAR > BLUR > GAUSSIAN BLUR
Smoky Effect 10
In coming up next small window, you can set Blur radius, For best result set it around 20.
Smoky Effect 11

STEP 8 : Apply Ripple Distort

Now follow these steps to add some ripple effect on your lines bitmap image.
TOP MENUBAR > BITMAPS > DISTORT > RIPPLE
Smoky Effect 12
In coming up next small  window Period and amplitude to give a wave effect.
 Smoky Effect 13
Your smoke effect is ready now.
Done !!!
You can use this trick on texts also. You have to Break apart of text and also convert into curve.


EXAMPLE :


Smoky Effect Final

Use of SHAPE TOOL in CorelDraw

SHAPE TOOL:

If you want to be a good designer, you must be a master in use of SHAPE TOOL. This is a very useful tool to make your own imaginable design.  In this post I am trying to guide you about SHAPE TOOL.
Use of SHAPE TOOL
You can use this tool on any object to modify it’s shape, even you can use it on text after convert it to curve. 

SHAPE TOOLBAR:

When you select an object and chose SHAPE TOOL this TOOLBAR will be automatically enabled. Here we have many deferent types SHAPE TOOLS for manipulate an object. Now I am going to introduce almost all tools of SHAPE TOOLBAR. 

Use of SHAPE TOOL
  • Add Nodes
Image634097091262656250This tool increase the number of editable line segments in the curve object by adding nodes. see in below screenshot, after selection of second line I just clicked on ADD NODES TOOL and this line have many nodes for manipulate it. Click  one or more times on this tool, depends on how many nodes you want.
Use of SHAPE TOOL
  • Delete Nodes
Image634097092948750000This tool reshape the curve object by deleting nodes. Look at below screenshot, If I delete these two nodes which I marked on first line, Shape would be change like second line.

Use of SHAPE TOOL
  • Join two nodes
Image634097156143750000This tool join the starting node and the end node of an open path to create a closed object or path. Look at below screenshot, If I delete these two nodes which I marked on first line, Shape would be change like second line.

Use of SHAPE TOOL

  • Break curve
Image634097156996093750This tool break a path in the open or closed curve object. Select a nod and clock on this tool, it will break he curve line.

Use of SHAPE TOOL
  • Convert to line and convert to curve
Image634097193944218750Image634097194529062500If your line segment is in curve, “Convert to line” tool convert it into line and if your line segment is in line, “Convert to curve” convert it into curve.

Use of SHAPE TOOLUse of SHAPE TOOL

  • Cups Node
Image634097197712656250This tool create a sharp angle in the curve by converting the node to a cups node.

  • Smooth Node
Image634097199339062500This tool will smooth the roundness of the curve by converting the node to a smooth node.

  • Symmetrical Node
Image634097202696093750
This tool can apply the same curve shape to both sides of the node.


  • Reverse Direction
Image634097207594375000
This tool can Reverse the position of the starting node and the end node.

I hope this article will help you. Please do comments if you like it.

Related Posts with Thumbnails
Protected by Copyscape Web Plagiarism Detection