After my previous post “Introduction of this blog”, hope you understand what is the purpose of this blog. I am posting my first tutorial regarding Corel Draw.
In this tutorial you will learn how to create a glossy web buttons. Yes, using Corel Draw anyone can made a stylish and glossy web buttons easily.
Step 1: Open a new file in Corel Draw.
Step 2: Select a RECTANGLE TOOL or ELLIPS TOOL (whatever shape you want) from the tool bar which is mostly located in the left side. For example we used RECTANGLE TOOL here in this tutorial. Draw a rectangle.

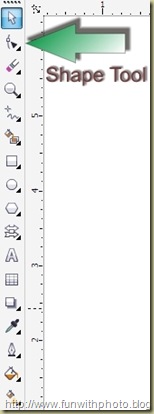
Step 3: Now chose a SHAPE TOOL from the left-side tool bar. With the help of this tool you can shape easily of you rectangle. Like this…
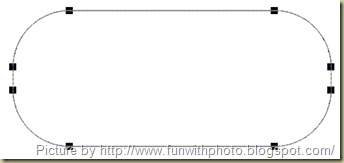
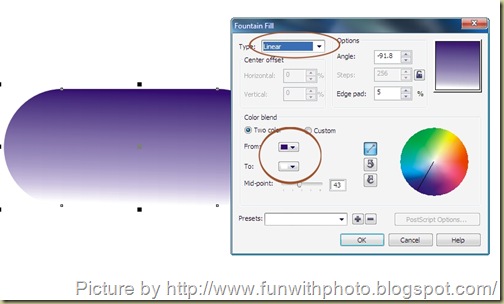
Step 4: Now with SELECTION TOOL select rectangle (Actually it is not a rectangle now :P) and hold your mouse pointer two second on a FILL TOOL for different types of FILLS. Select a FOUNTAIN FILL DIALOG or press F-11. Next small window will pop-up. Here you can chose any two color and fill both combination. like this….

Step 5: Now we need a duplicate copy of our rectangle, so click and hold selected rectangle, drag it somewhere else nearer and press right click of your mouse before release left button. Select second rectangle and flip it at 180˚ like this…

Step 6: Transform second rectangle, reduce its size and put it in to first one rectangle like shown in below screenshot.

Step 7: Select second rectangle and chose a TRANSPERENCY TOOL from the TOOL BAR, and apply it on second rectangle like shown in below screenshot.

Step 8: Repeat step 5 and create another rectangle and put it in between 1st and 2nd rectangle and apply transparency on it also.

Final Image and few examples

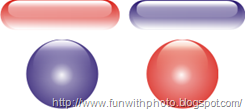
Select whole your creation and follow these steps to save it in PNG format or you can save it in a CDR format if you want modification in future.
MENUBAE –> FILE –> EXPORT FOR OFFICE (PNG)
MENUBAR –> FILE –> SAVE (CDR)
In this tutorial you will learn how to create a glossy web buttons. Yes, using Corel Draw anyone can made a stylish and glossy web buttons easily.
Step 1: Open a new file in Corel Draw.
Step 2: Select a RECTANGLE TOOL or ELLIPS TOOL (whatever shape you want) from the tool bar which is mostly located in the left side. For example we used RECTANGLE TOOL here in this tutorial. Draw a rectangle.

Step 3: Now chose a SHAPE TOOL from the left-side tool bar. With the help of this tool you can shape easily of you rectangle. Like this…


Step 4: Now with SELECTION TOOL select rectangle (Actually it is not a rectangle now :P) and hold your mouse pointer two second on a FILL TOOL for different types of FILLS. Select a FOUNTAIN FILL DIALOG or press F-11. Next small window will pop-up. Here you can chose any two color and fill both combination. like this….


Step 5: Now we need a duplicate copy of our rectangle, so click and hold selected rectangle, drag it somewhere else nearer and press right click of your mouse before release left button. Select second rectangle and flip it at 180˚ like this…

Step 6: Transform second rectangle, reduce its size and put it in to first one rectangle like shown in below screenshot.

Step 7: Select second rectangle and chose a TRANSPERENCY TOOL from the TOOL BAR, and apply it on second rectangle like shown in below screenshot.

Step 8: Repeat step 5 and create another rectangle and put it in between 1st and 2nd rectangle and apply transparency on it also.

Final Image and few examples


Select whole your creation and follow these steps to save it in PNG format or you can save it in a CDR format if you want modification in future.
MENUBAE –> FILE –> EXPORT FOR OFFICE (PNG)
MENUBAR –> FILE –> SAVE (CDR)


4 comments:
Anonymous
April 25, 2010 at 4:24 AM
Permalink this comment
1
nice post Mac :D
MaC
April 25, 2010 at 9:37 AM
Permalink this comment
1
Thanks Dhawal
Siddharth Srivastava
April 25, 2010 at 10:38 PM
Permalink this comment
1
Very Nice Post, How easily explained...!
Awesome...Mind-blowing :P
MaC
April 26, 2010 at 4:58 AM
Permalink this comment
1
Thanks Siddharth... :)
Post a Comment